User Guide > Working with projects and projects files > Change a project settings > Adding multi-language support to the application
Applications speaking on different languages are typical today, and with Autoplay Menu Designer you can make your app multi-language too. In particular this means that the whole interface of your application including labels, buttons, text boxes and more is translated to another language.
Such option is extremely useful when you want to distribute the same application on different international markets, or if you want your app to be available for users in various countries on their native languages. Aside from translating the interface you can also distribute different files or set up different behaviors of the app depending on the selected language.
To add multi-language support to your application, you should open the “Project | Settings” menu and switch to the Localization tab.
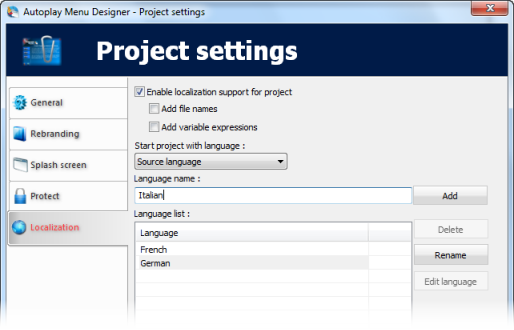
Turn on the "Enable localization support for the project" option.
Now add at least one language to the project: type the name of a language (e.g. French) to the text box and click the Add button. The language will be added to the language list; select it and click the "Edit language" button to edit it (see below).
![]() Hint: localization is better to be done when your project is ready or almost ready, however, you can add a language to your application at any time.
Hint: localization is better to be done when your project is ready or almost ready, however, you can add a language to your application at any time.
Aside from interface elements (buttons, text labels, window names etc.) you can also translate file names your application uses and variable names. This can be useful, for instance, if some graphic elements of the application also require translation, or if you want to distribute specific files depending on the locale. Translating variable expressions allows using different string constants in variable expressions with its own local string for each language.
The "Add file names" and the "Add variable expression" options allow you to add filenames and variable expressions to the translation.
The "Default language" option tells the application which language it should activate on startup. This can be some specific language of those that are in the language list, or the native language your project is built with.
How to make a translation?
When you build the project, Autoplay Menu Designer generates LANGUAGE files <Language name>.lng that contain all text from your project. Files are located in the <Project folder>\Resources\Languages.
LANGUAGE file syntax:
[SectionName]
"Key"="Value"
Key - original (native) text
Value - translated text
You should translate the text to the right of the '=' char on each line in the language (lng) files.
The '\r\n' symbols in multi-line texts identify line breaks.
If a text contains the “=” symbol, it changes to "%3D".
If a text contains the “%” symbol, it changes to "%%".
If you want to assign an empty value to some key use “$(none)” as the value.
!!! IMPORTANT !!!
1. DO NOT USE SPACES BETWEEN KEY, “=”, AND VALUE
2. DO NOT REMOVE THE “\t” SYMBOL!!!
Whenever you build the project Autoplay Menu Designer preserves already translated texts.
How to switch the language at runtime
There is a special action that allows you to switch languages at run-time. After the translation is done, all you need to do to switch the language is to assign the "Change language" action to some control (usually a button or an image).
![]() These settings available for BUSINESS LICENSE only.
These settings available for BUSINESS LICENSE only.