The new version of Autoplay Menu Designer as always brings a lot of useful options. Let's take a look at what the update offers to you.
What's new in Autoplay Menu Designer 5.4
Now, along with static images, you can also place animated GIFs to any window of your application. The list of possible uses is limitless:
- Animated diagrams and graphs
- Simple cartoons
- Animated instructions
- Animated characters
To add an animated GIF to the window, select the "Animated GIF tool" on the tools panel:
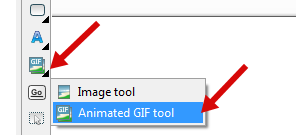
Then draw the place where the animation should be, and choose the GIF file for the animation.
Looks awesome! But a never-ending animation is not always what we need. So the new version also introduces a corresponding action to start and stop GIF:
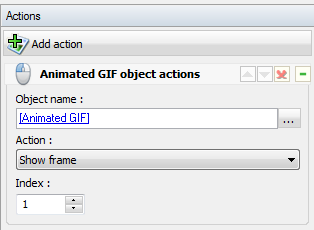
You can assign this action to other objects like buttons to run the animation whenever you need or even display a specific frame from it.
With new popup window functionality you can create modal dialogs and popup windows that require user attention.
Functionally, popup windows are much like the main window object. They can have multiple pages with individual interface and design, and you can address variables and execute actions in such windows.
You can use popup windows to display confirmation dialogs, configuration windows and other modal dialogs that require some input from a user, ask him or her about settings, execution options and so on.
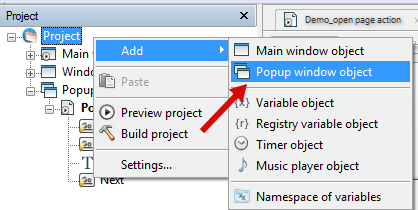
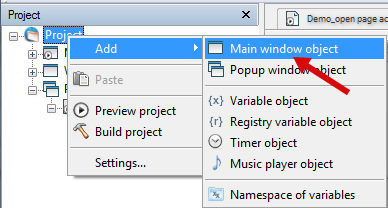
To add a popup window object, right-click the Project object in the Project panel and use the context menu to add a popup window :
You can display a popup window as usual, using the standard "Open page" action. If you choose a page that belongs to a popup window, this popup window is displayed, and the selected page is activated.
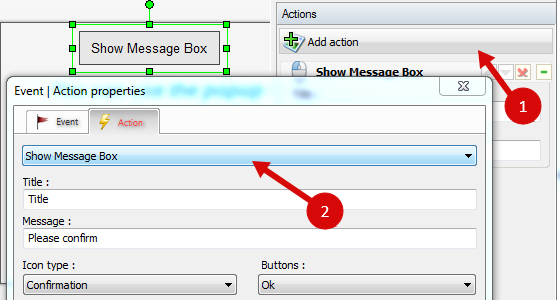
3. Show message boxes and prompts to a user
The new version of Autoplay Menu Designer adds a new "Show Message Box" action. With it, you can ask questions to a user, show warnings, receive feedback and deliver other interaction.
4. Automatically open a particular window at startup of the app
Conditional display of a certain window on startup is another long-awaited feature of Autoplay Menu Designer. You create several main windows and display one or another depending on specific conditions: screen resolution, system locale or OS version to name a few.
One of the common uses for the new option is displaying different autorun menus for different screen resolutions. Prior to the version 5.4 you already could have several main windows and show one or another. The soft spot was you had to ask a user to select the particular window manually, because there were no any ways in Autoplay Menu Designer to detect the screen resolution automatically and display the corresponding window.
Now you can determine the screen resolution and automatically show the proper main window of the application or menu.
Here is the step-by-step guide to select a starting window:
a) Create two (or more if necessary) windows. One you have by default, so you need to create the rest. To add a main window object, right-click the Project object in the Project panel and use the context menu to add a main window.
We want each window to show only for certain screen resolutions.
b) In each window, create one or more pages for the given screen width and height.
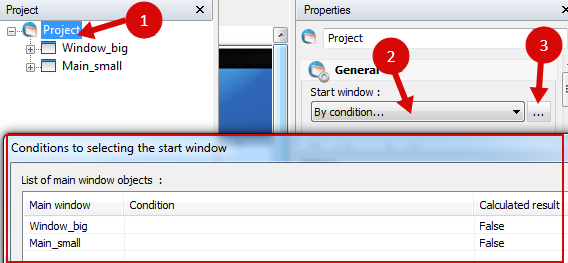
c) Select the Project object in the Project panel, switch to the Properties panel, select "By condition" in the dropdown list, and in the General section click the "..." button. This will open the condition selection window:
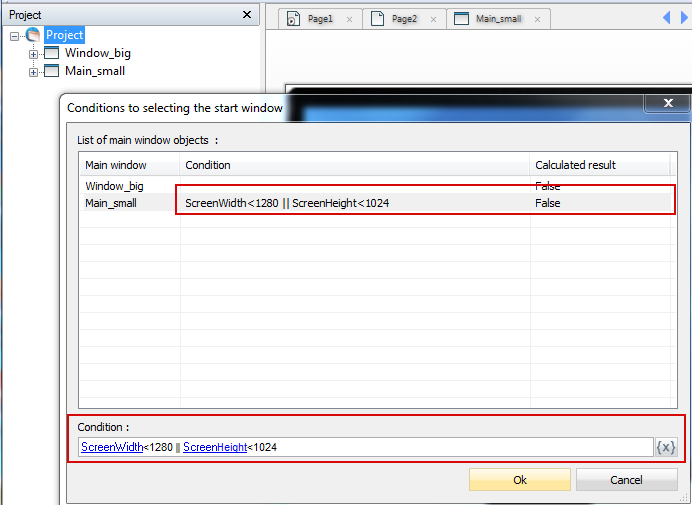
d) Now, let's specify the condition. Select the "Main_small" in the list. We need to show this window on low resolutions, below 1280x1024 pixels. Compose the conditional expression as shown below (use the Expression button (![]() ) to paste "ScreenWidth" and "ScreenHeight" variables to the expression).
) to paste "ScreenWidth" and "ScreenHeight" variables to the expression).
Autoplay Menu Designer calculates conditional expressions of all windows starting from the first in the list. If an expression evaluates to True, the corresponding window is displayed. If all expressions evaluate to False, the first window is displayed. To change the order of windows in the list, drag and drop them in the Project panel.
In our case, if the expression evaluates to True, the "Main_Small" window is shown. Specifically, the "Main_Small" is displayed when the screen width is less than 1280 pixels OR the screen height is less than 1024 pixels. Otherwise the "Window_big" is displayed.
4. Quickly show or hide objects depending on their current state
The "Invert state" command in the "Show/Hide objects" action added in Autoplay Menu Designer 5.4 does just one thing: it shows an object if it's hidden, and hides it if it's visible. Not a big deal after all, but saves time when you have many of those flip/flop objects.
5. New system variables
Starting from the new version, you can use the following system variables in the expression editor:
- ScreenWidth (the width in pixels of a user's screen)
- ScreenHeight (the height in pixels of a user's screen)
- SysLocaleName (the locale name of the operating system based on RFC 4646. Generally, the pattern <language>-<REGION> is used. Here, language is a lowercase ISO 639 language code. The codes from ISO 639-1 are used when available. Otherwise, codes from ISO 639-2/T are used. REGION specifies an uppercase ISO 3166-1 country/region identifier. For example, the locale name for English (United States) is "en-US".)
- SysLanguageName (the lowercase ISO 639 language code , for example: "en" - English, "fr" - French, "de" - German, "it" - Italian, "es" - Spanish and etc.)
The first two variables are already described above, so let's take a brief look at the other two. These variables allow you to detect the local language on user's computer and adjust the interface of the menu as well as to run localized versions of installers, PDF documents, Word documents, or other documents depending on the system language.
As you know, Autoplay Menu Designer supports multi-language localization of your autorun menu/app by loading corresponding language files. In the new version you can automatically switch the app to the language of user's system. Here is how you can automatically load the corresponding language file based on the SysLanguageName variable.
At first, enable localization support if you haven't done this before. Open the "Project -> Settings -> Localization" tab, and turn on the corresponding option.
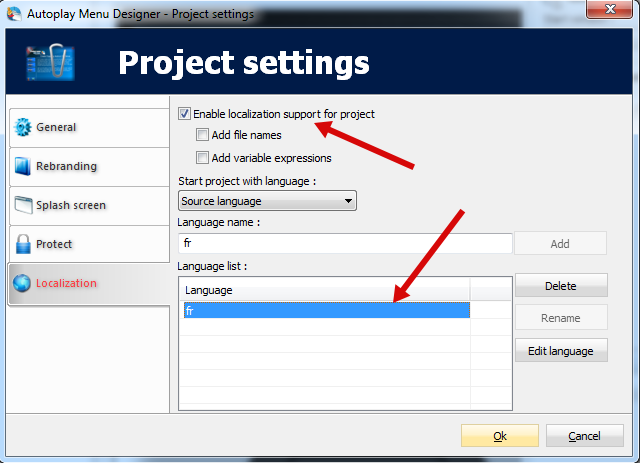
Then, add the languages you application supports. Here you can read more about editing languages. The 2/3-character language abbreviation should be in compliance with ISO 639 language code (for example: "en" - English, "fr" - French, "de" - German, "it" - Italian, "es" - Spanish and etc.).
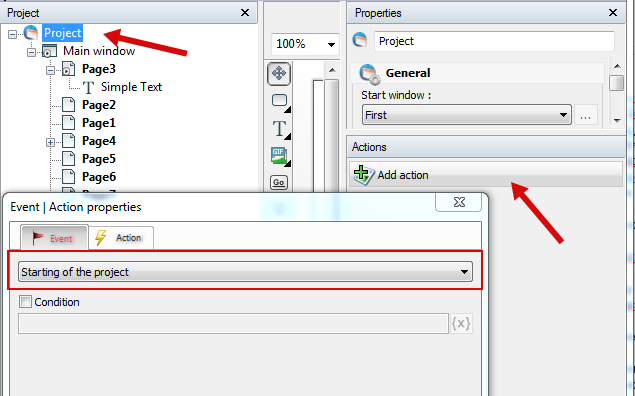
Our application should automatically switch to the local language, so we need to add a new action that executes when the project starts.
Click the "Add action" button in the Actions section of the Project properties panel. On the Event tab select the "Starting of the project" event.
Now switch to the Action tab and select the "Change variable" action.
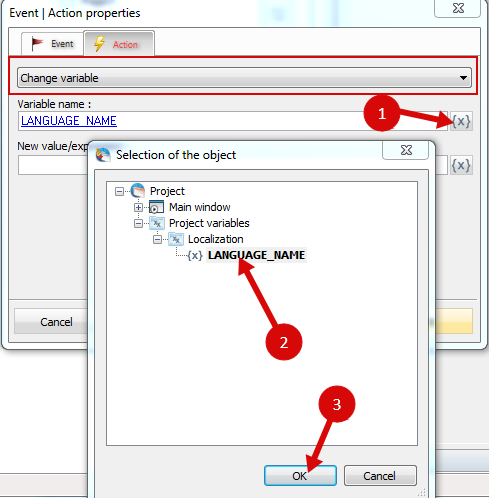
In the "Variable name" field, click the Expression button(![]() ) and select the LANGUAGE_NAME variable from the "Project variables->Localization" node. This built-in variable controls which language resource the app uses.
) and select the LANGUAGE_NAME variable from the "Project variables->Localization" node. This built-in variable controls which language resource the app uses.
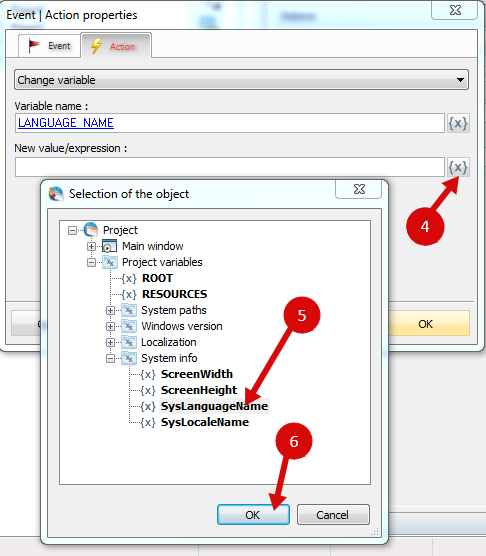
Then, assign a new value to this variable, specifically, a value of the new SysLanguageName system variable from the "Project variables->System info" node :
Save the changes.
Now, your app will automatically switch to French and load its text resources from the "fr.lng" file if the system language of a user's computer is French and, correspondingly, the value of the SysLanguageName variable is "fr".
If the value of the SysLanguageName does not match any of values in the language list (on the "Project->Settings->Localization" tab), the default language is used.