What's new in Autoplay Menu Designer 5.9
1. Find and Replace Function
You can now quickly search and replace text across your entire project. The search tool supports both simple text queries and advanced regular expressions -- from basic matches to complex patterns. You can limit the search to specific object types(1) (for example, only text blocks or buttons) or target individual properties(2) such as name, text, background images, media files, and more.

This makes it easy to update labels, fix typos, and apply bulk changes without touching unnecessary elements.
Search also works as a fast navigation tool -- instantly jump to any object, even in large projects with hundreds of elements.

But there's more! The search tool can modify not only text but any object properties based on a template stored in the clipboard. Simply copy a template object and apply its properties to selected targets -- for example, to all buttons.

This allows you to update the visual design of an entire project in just a few seconds.
2. System Tray Support
Give your applications even more flexibility -- they can now minimize to the system tray while staying active in the background. Perfect for background utilities and tools that need to run quietly behind the scenes.

To minimize your app to the System Tray use the "Management of a window" action

A custom tray icon menu is also available, allowing you to run commands, control your application, or interact with external services directly from the tray.

To process a menu command use the "System Tray Menu Click" event(available for Page and Window objects) and Menu Item ID

3. "Debugging" mode
A simple application with little or no scripted behavior does not necessarily need debugging, a preview is often more than enough. However, if you use many variables, events and actions to program the behavior of your application you will find debugging extremely helpful.
To enable debugging, go to Menu->Tools->Options->Debugging:

Enable debugging to receive additional information about your application next to the preview window.
Specifically, the runtime debugger window displays all events that occur while your app is running (1): mouse clicks, double clicks, mouse cursor entering or leaving an object and so on. The window also displays associated actions executed. For convenience, you can filter the list down to certain types of events only (2) :

Another important capability is variables watch. You can add any variables on the Variables tab to see how their values change in runtime (2). Click the Add variable (1) button to add any project variable to the watch :

4. Designing with Components
The new version simplifies work with repeated similar interface elements, for example, the "Next" buttons on multiple Wizard tabs. The concept of components allow you to transform any graphical object into some kind of a stencil (Component) that transfers its properties to all copies of that object. In this case, whenever you modify the Component, all other instances of that object automatically receive the changes too.
To create a Component, select the "Make Component from Object" item in the context menu of the object.

The corresponding icon in the Project outline will indicate the object is in fact a Component.

Now, if you copy the Component with any method, all its copies will be highlighted with a red dotted line.

Then, whenever you change the Component, all linked instances will be changed too.

If you need the copies to retain some individual properties, you can configure them using the "Component settings..." item in the context menu.

Then select properties you want to apply to every instance. Other parameters of each object can be changed individually.

To turn a Component back to a normal object, select the "Make unique" item in the context menu to untie the object from its copies.

Note that you can also apply the "Component" function to a group of objects. This allows you to create even more complex templates for reuse.
5. Create popup windows
With new popup window functionality you can create modal dialogs and popup windows that require user attention.
Functionally, popup windows are much like the main window object. They can have multiple pages with individual interface and design, and you can address variables and execute actions in such windows.
You can use popup windows to display confirmation dialogs, configuration windows and other modal dialogs that require some input from a user, ask him or her about settings, execution options and so on.
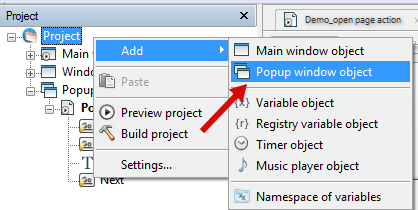
To add a popup window object, right-click the Project object in the Project panel and use the context menu to add a popup window :
You can display a popup window as usual, using the standard "Open page" action. If you choose a page that belongs to a popup window, this popup window is displayed, and the selected page is activated.
You can download the latest version here : https://www.visualdesigning.com/download/ and try it.