User Guide > Working with projects and projects files > Build and Test a project
To build a project
| 1. | On the Project menu, click Build project (F7 hotkey) or click the Build button ( |
| 2. | The Building project dialog will appear. |
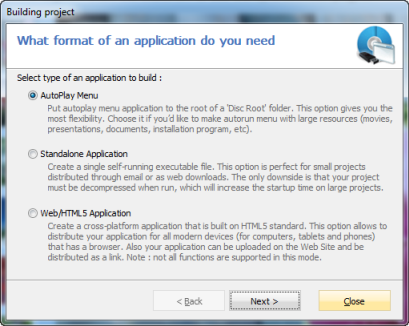
| 3. | Select one of the following types of applications: |
| • | AutoPlay Menu - this mode produces a standard Windows application executable (.exe). It is also the most flexible mode. This app type is recommended for projects containing large files like video presentations, movies, documents, setup programs and so on). |
| • | Standalone Application - selecting this mode produces a single standalone “all-in-one” Windows executable (.exe). All data files and files in the root folder are compressed into a single executable. We recommend this option for relatively small projects, because since all files of the project are compressed into one, additional time is needed to decompress them upon run, which may be inconvenient in case of large files. |
| • | Web application - use this mode to build a HTML5 application and supporting files including an HTML start page(index.html) that loads your application in a browser. This option is recommended for cross-platform solutions as well as for publishing on Web for further distribution via a link. |
| 4. | Click Next |
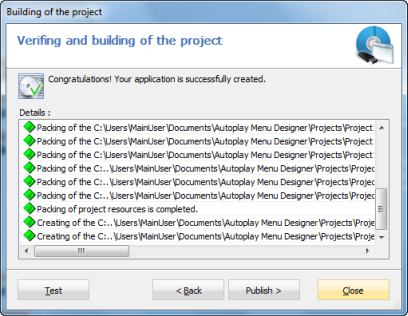
| 5. | So you can see as Autoplay Menu Designer builds your project. The final product that you produce after you build a project depends on the building mode. As soon as the project is built, you can see the result in the Building project dialog. You can see a log of the process creation in the Details. |
Each icon is attached to certain type of the message:
(![]() ) - information - the operation is executed successfully.
) - information - the operation is executed successfully.
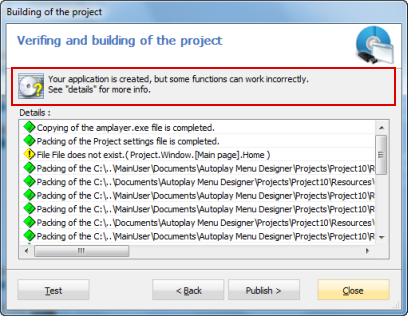
(![]() ) - error - the error of an operation . This error is not critical, and most likely will require certain action to correct it. (For example, if a nonexistent musical file for the page music properties is chosen, you will not hear any music during the page viewing, but everything else will work fine).
) - error - the error of an operation . This error is not critical, and most likely will require certain action to correct it. (For example, if a nonexistent musical file for the page music properties is chosen, you will not hear any music during the page viewing, but everything else will work fine).
(![]() ) - critical error - the error which show impossibility of the application creation. Probably, the output folder is protected from changes or there is no free space on the disc. It is also possible, that some files from the Autoplay Menu Designer distribution kit are damaged.
) - critical error - the error which show impossibility of the application creation. Probably, the output folder is protected from changes or there is no free space on the disc. It is also possible, that some files from the Autoplay Menu Designer distribution kit are damaged.
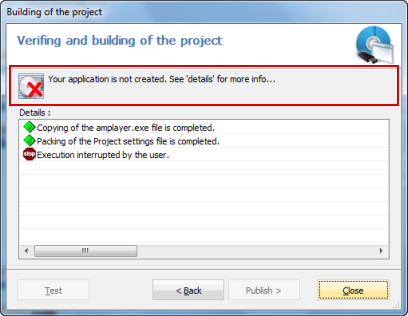
(![]() ) - the process of creation was interrupted by the user.
) - the process of creation was interrupted by the user.
5.1 You'll see this dialog, if during a creation of the application some critical errors occur or the process was interrupted by the user. In this case, the Publish button will be disabled. Correct the errors and repeat the process of the creation. You can see errors descriptions in the Details log.
5.2 You'll see this dialog, if during an application creation some minor errors occur. To see the errors description press the Details button. In this case, you can publish your application, but some functions may work incorrectly. It is better to correct these errors.
5.3 You'll see this dialog, if your application is created successfully without errors. After that you can publish the application by using Publish button.
6. Click the Test to run the resulting application.
7. Click the Publish to publish the resulting application.
See also